Robes de Coeur
  • Blog
  • Quilting
  • Clothing
    • Menswear
    • Womenswear >
      • Self-Made Patterns
      • Commercial Patterns
    • Hats
    • Miscellany
  • About
  • Blog
  • Quilting
  • Clothing
    • Menswear
    • Womenswear >
      • Self-Made Patterns
      • Commercial Patterns
    • Hats
    • Miscellany
  • About

Butterick 3836, Plaid Wool Blazer

1/10/2019

1 Comment

 
Picture
Couture kitty likes the wool!
Today, I'm gonna try a new format for my project diary... I think it'll be useful for people learning to sew to have a clearer idea of how long something takes and how much it costs, so I'll start including those details as accurately as I can.  I also know that a lot of people stop reading when they see a block of text (not sure why, since I like blocks of text, but the world is diverse!), so I'll try to put vital stats in bullet points to make them easier to read. 
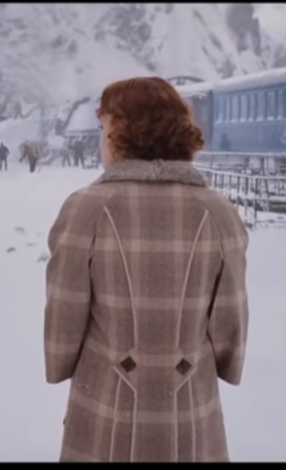
Thanks also to Jennifer Beeman, whose article "How to Match Plaids When You Sew", published by Sew Mama Sew, gave me confidence to do this and techniques that served me well! 

A RHAPSODY OF PLAID MATCHING

I love plaid, and always admire when it's sewn well.  I like it on the bias; I like it matching across seamlines; but I especially love it when it matches on curved seams like armscye/sleevecap.  Check out these examples from the 2017 film Murder on the Orient Express...
Picture
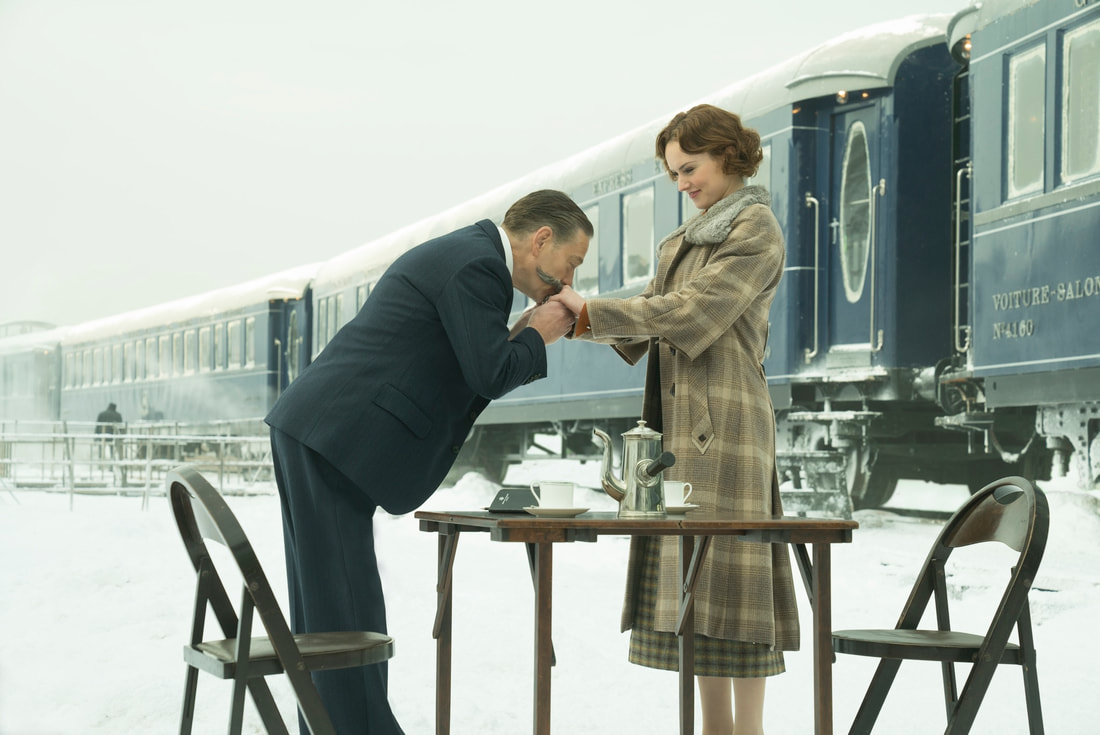
"Cher Mademoiselle, our train has been derailed in a blizzard. Let us to take tea outside while not wearing hats nor gloves. Bonne idée, n'est-ce pas?"
The designer really went all-out on that jacket she's wearing, huh?  Two-part raglan over-sleeves, with undersleeves, with pointy tab things that cleverly incorporate bodice-shaping darts and side pockets, and put some of the plaid on the bias for contrast! 
Picture
"I'm freezing to death, but at least I look fabulous!"
Picture
Dang! Piping on the seams and the pleats! more pointy tabs, with plaid matching everywhere...!
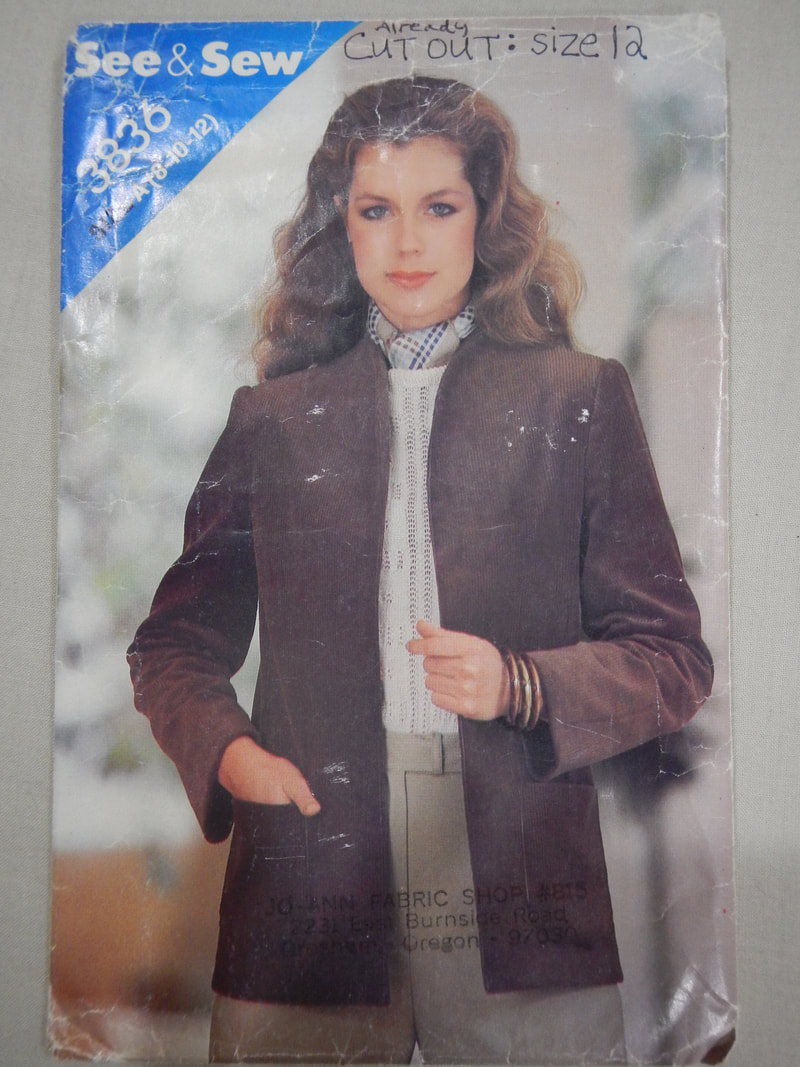
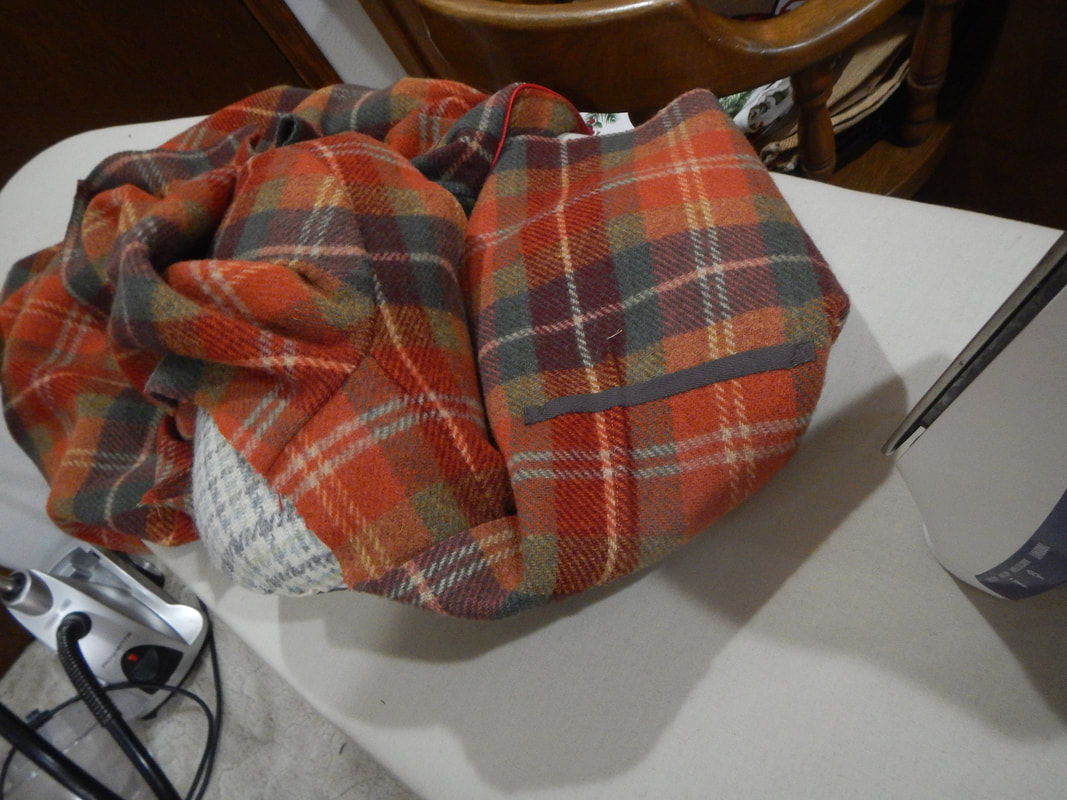
The same character gets a plaid suit as well:
Picture
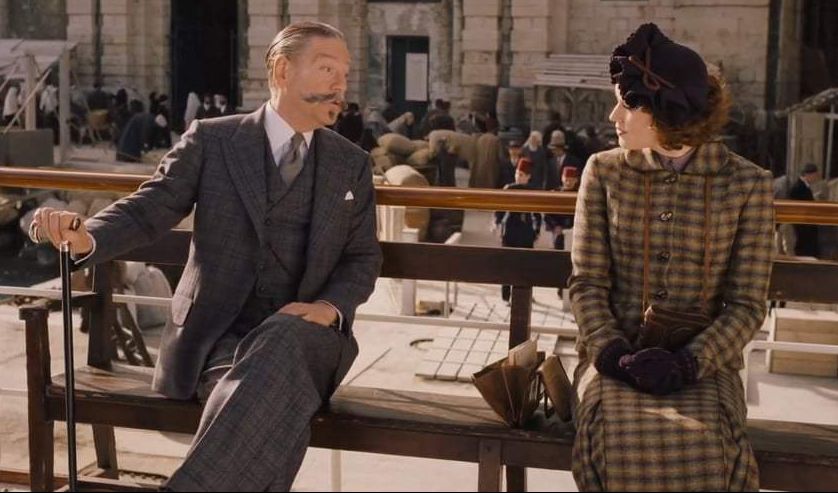
They both get good plaid here, but hers is more obvious.
So when I fall in love with an autumnal plaid at the Mill End Store, I buy it and pair it with a very simple blazer pattern, so I can to try my hand at plaid matching. 
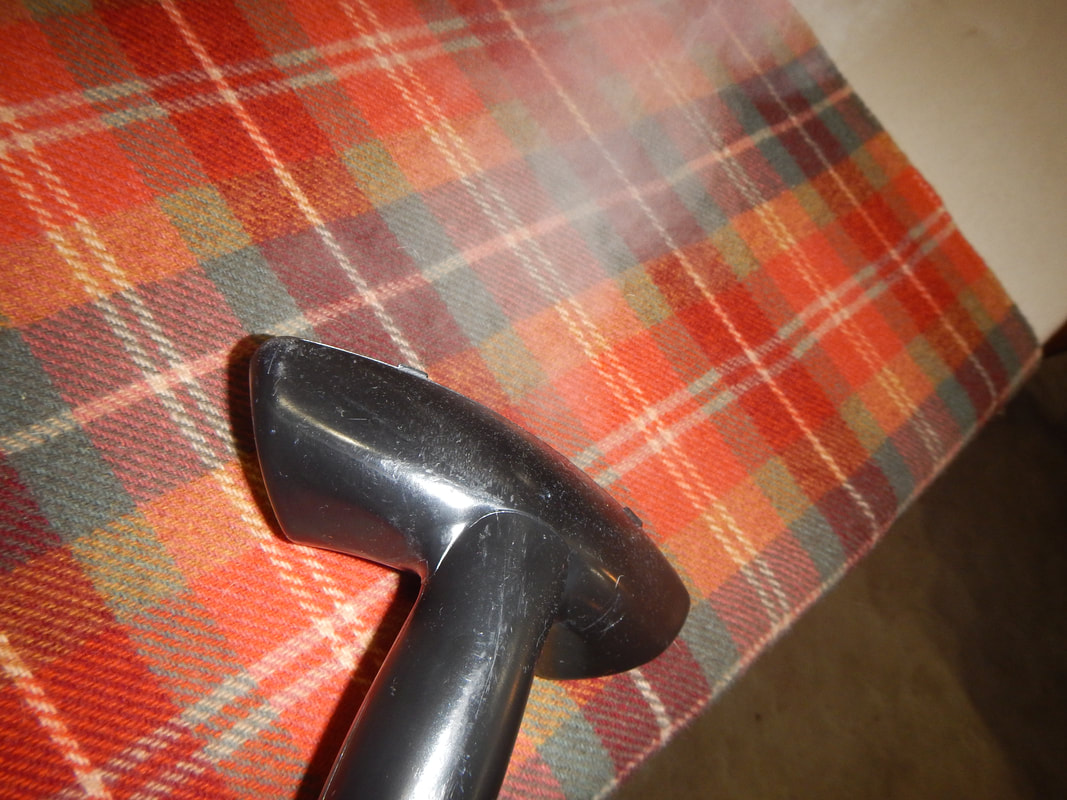
Picture
Butterick 3836 (See & Sew). From the 1980's, judging by her hair!

THE MATERIAL

Medium-weight wool (blend?)
balanced plaid, autumn colors
2 yards, 58" wide
$14.39/yard (discounted price)

My pattern (Butterick See & Sew 3836, size 12) costs me 99 cents at Goodwill.  It calls for 1 and 3/4 yards at 60" wide, so I think it'll work, even with the added difficulty of plaid matching.  I even have enough to do the facings of the same fabric. 

I also buy three yards of piping, at 30 cents a yard. 

TOTAL COST:
$30.67

PREP WORK

  • steam-shrink the wool (it loses less than an inch of width).
  • copy the pattern pieces so I can lay them out on only one layer of fabric.
  • Draw a horizontal line across the pattern pieces, for balance and plaid matching.  The line is just at the armpit level (bottom of armscye) across the front, front facing, back, and sleeve. 
Picture
steaming fabric

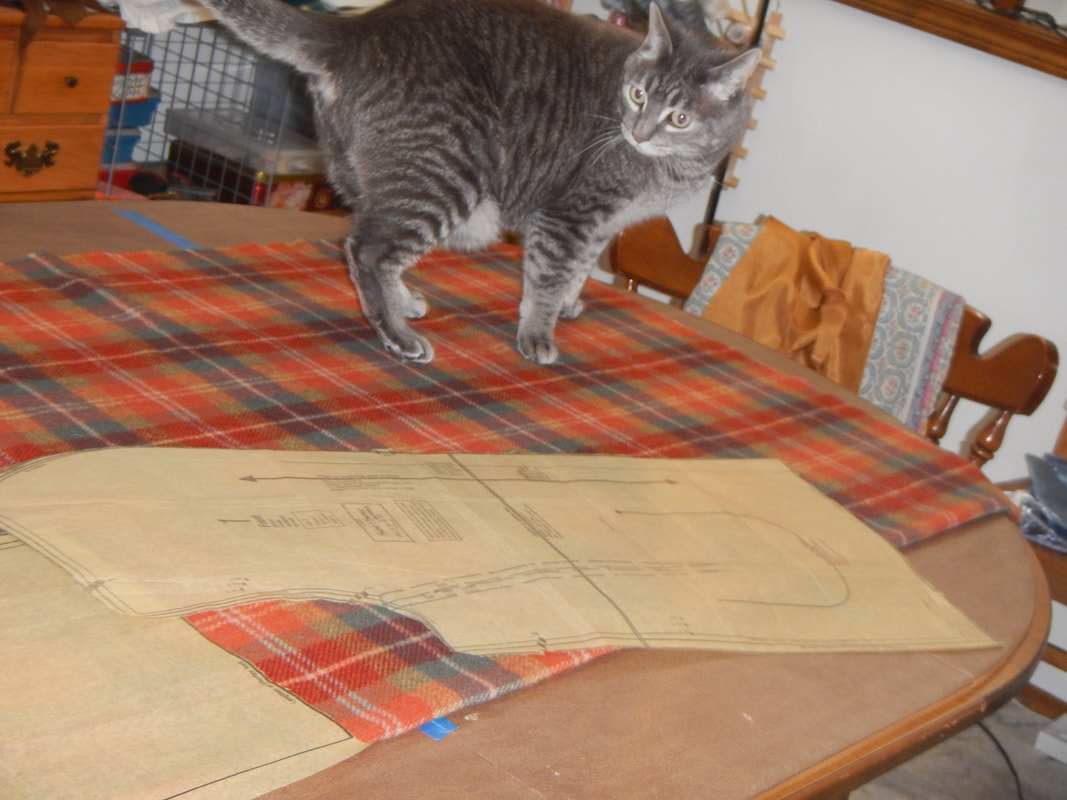
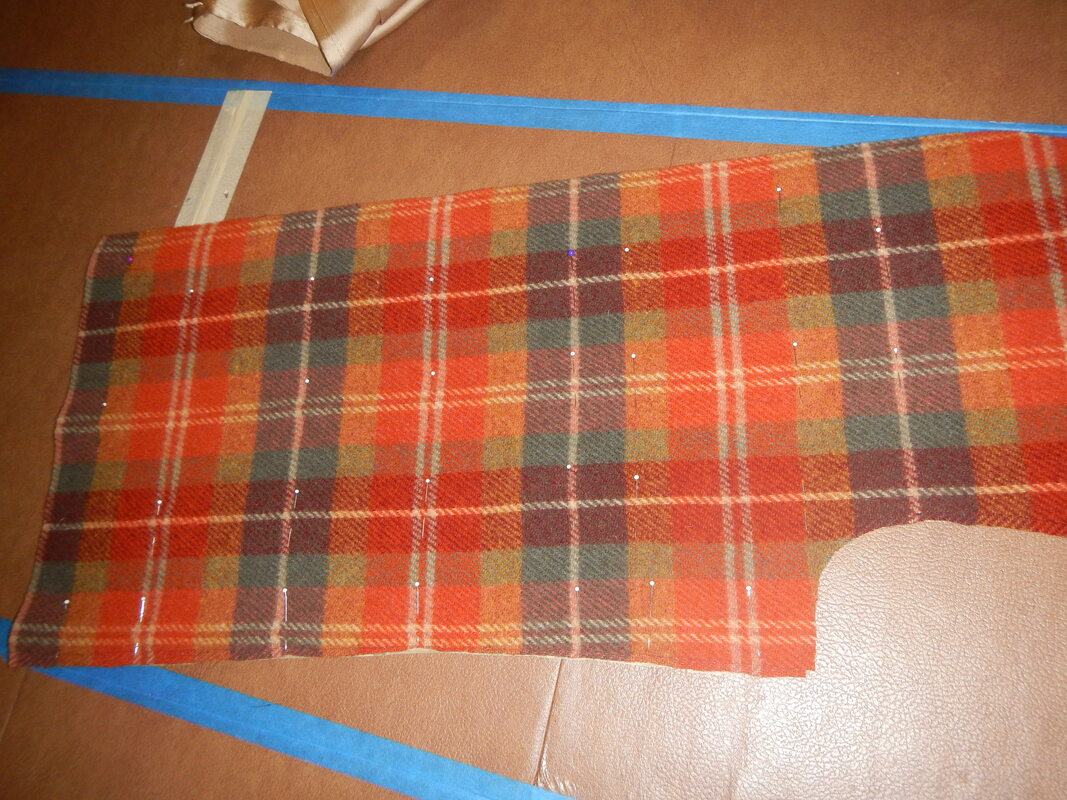
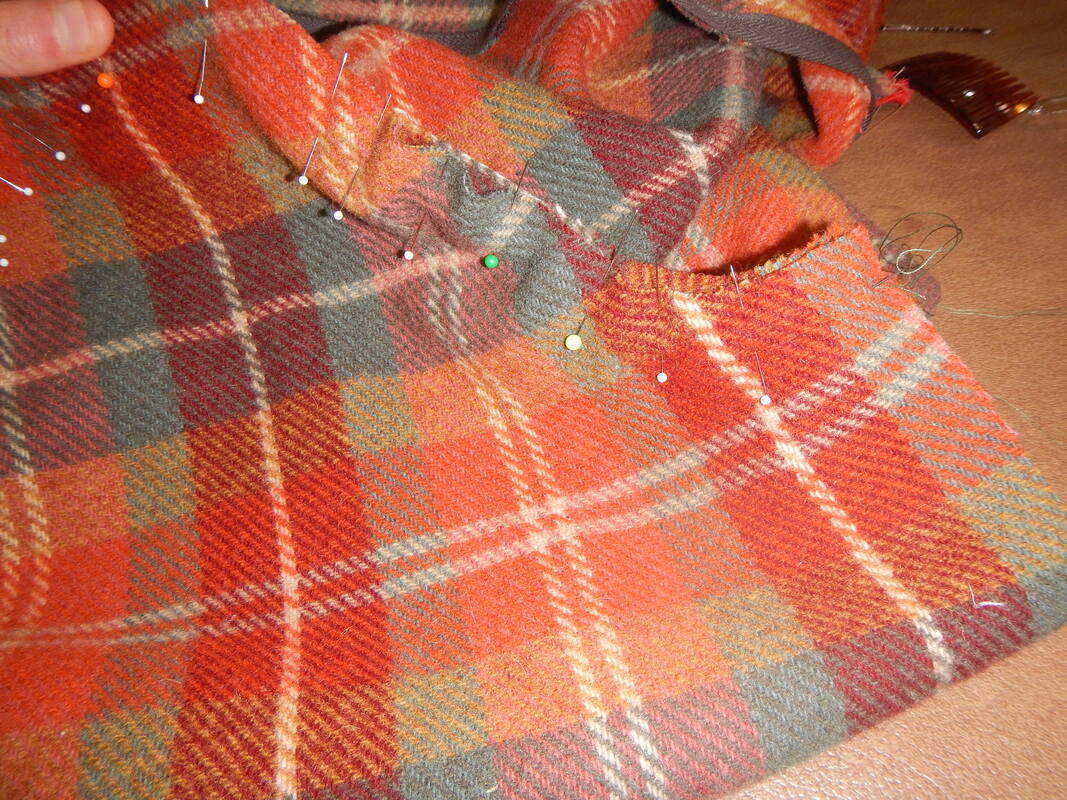
CUTTING

I unfold the fabric and lay the pattern on the single layer.  I line up the red horizontal strip with the balance line I drew on the pattern pieces.  Since it's a balanced plaid, I can turn one sleeve upside-down, which saves a little space.  Overall, a pretty efficient use of fabric! 
Picture
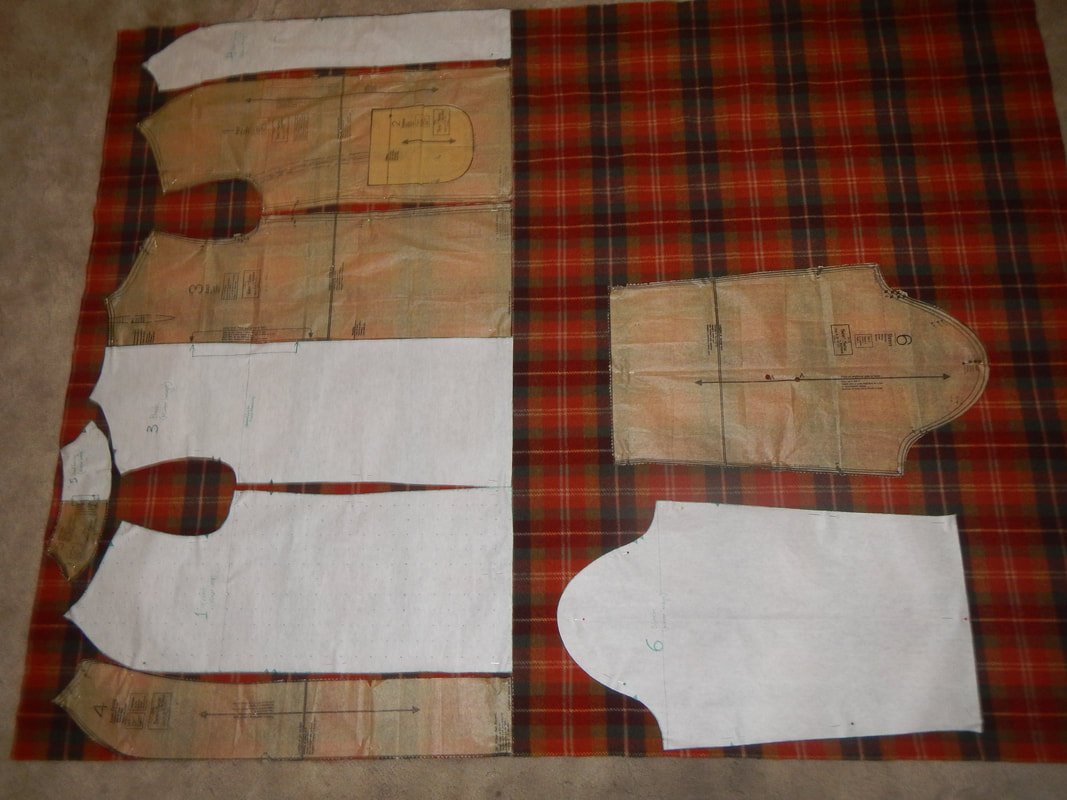
pattern pieces on single-layer of fabric
Despite my best efforts, I don't get the front two panels exactly the same.  When I pin them to each other and match the plaid lines (with lots of pins), I find a discrepancy of a half to a quarter inch. 
Picture
two front panels pinned together
Picture
discrepancy
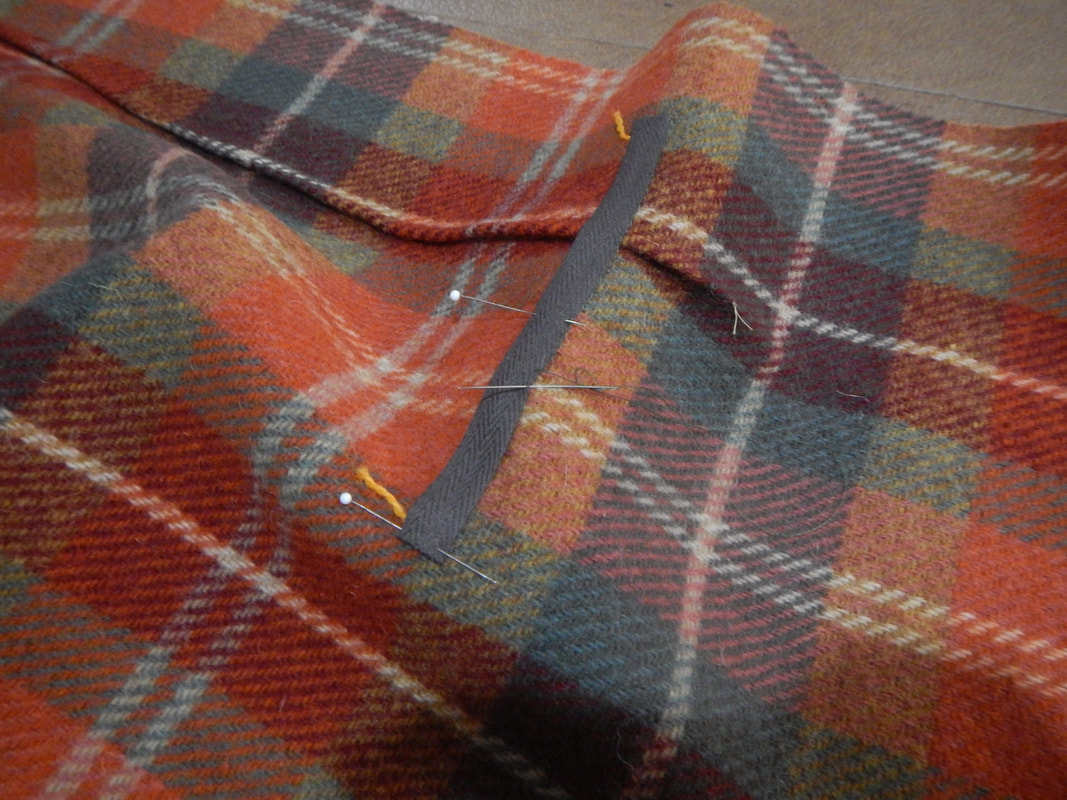
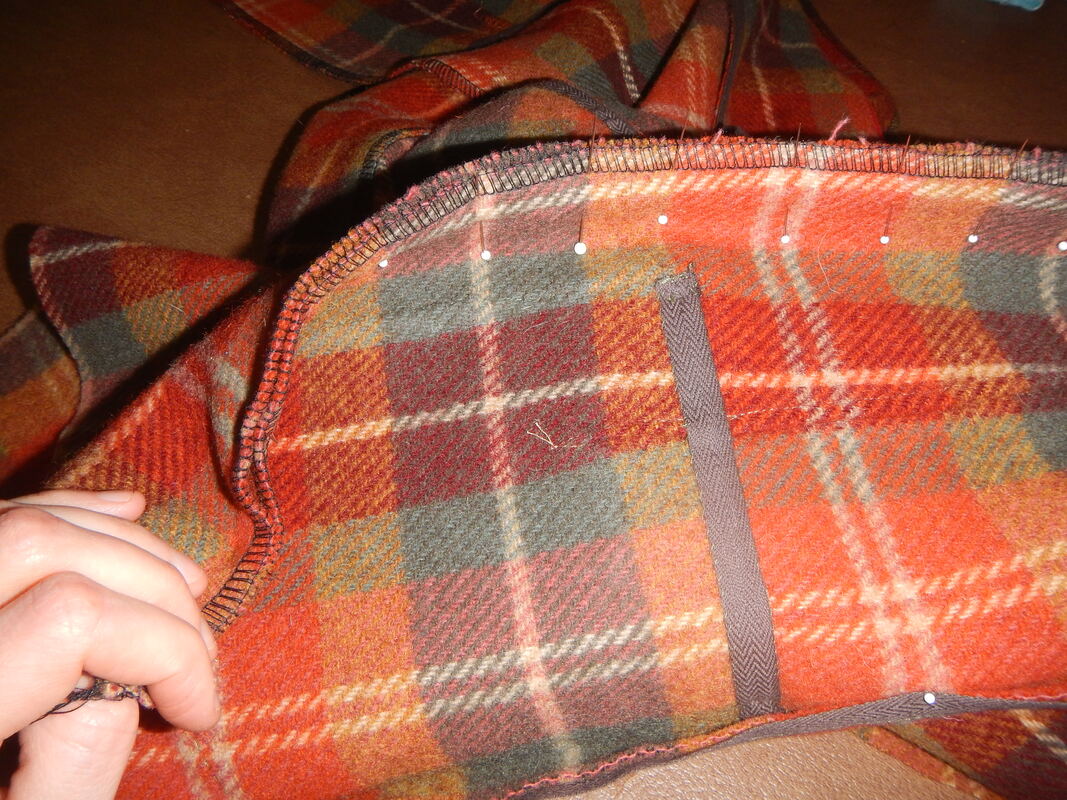
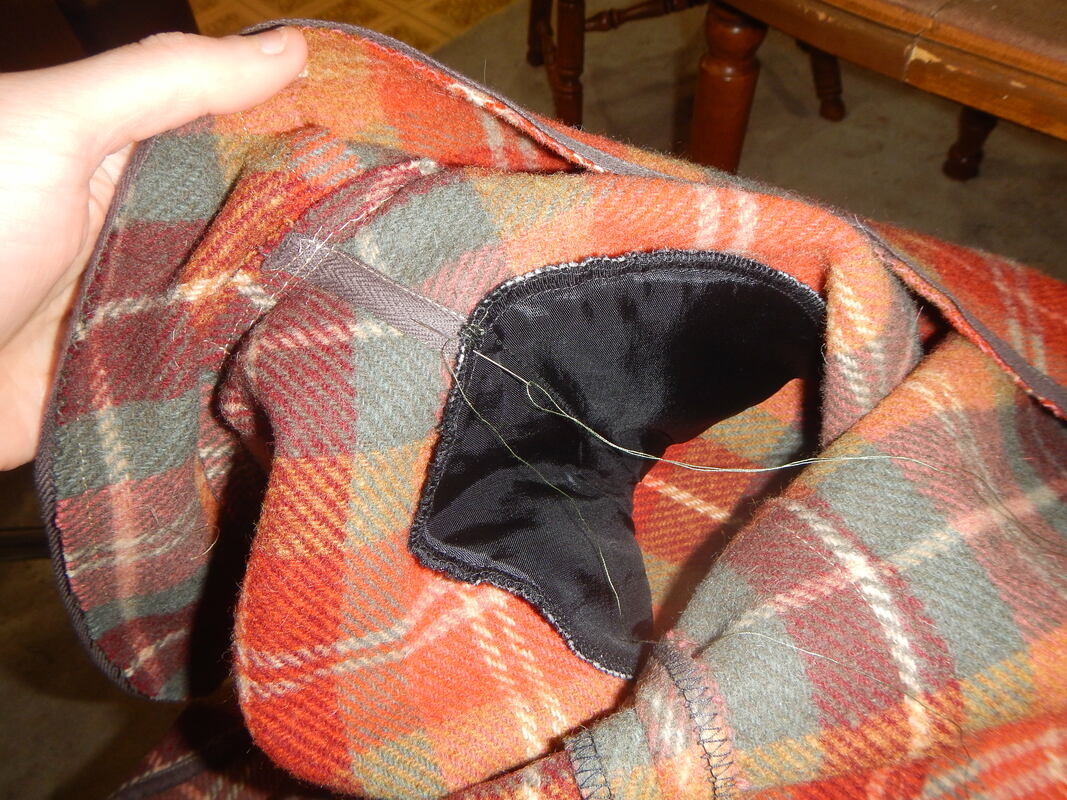
Thankfully, that discrepancy is not inside the armscye area, where it would mess up the sleeve-fitting.  The discrepancy occurs near the bottom of the pieces, where the fabric drifted askew from the balance line.  Next time maybe I should make horizontal and vertical balance lines... Anyway, I trim the excess away, figuring that, with a loose-fitting jacket like this, a fraction of an inch won't matter much, and my priority is for the panels to be exactly the same, to make the jacket look really good. 

I use crewel embroidery thread for tailor's tacks, to mark important points like darts and such.  There is a dart in the front panel, from armscye down over the bust-point and ending inside the hip area.  The pocket is sewn overtop the dart's terminus. 
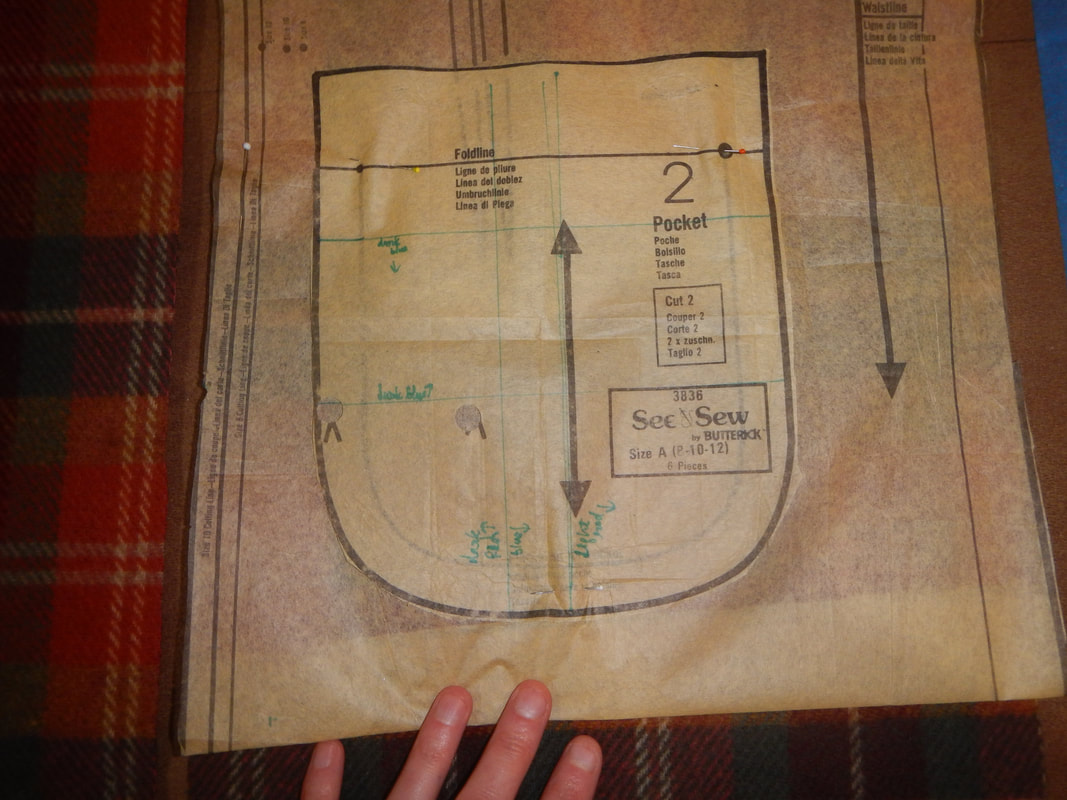
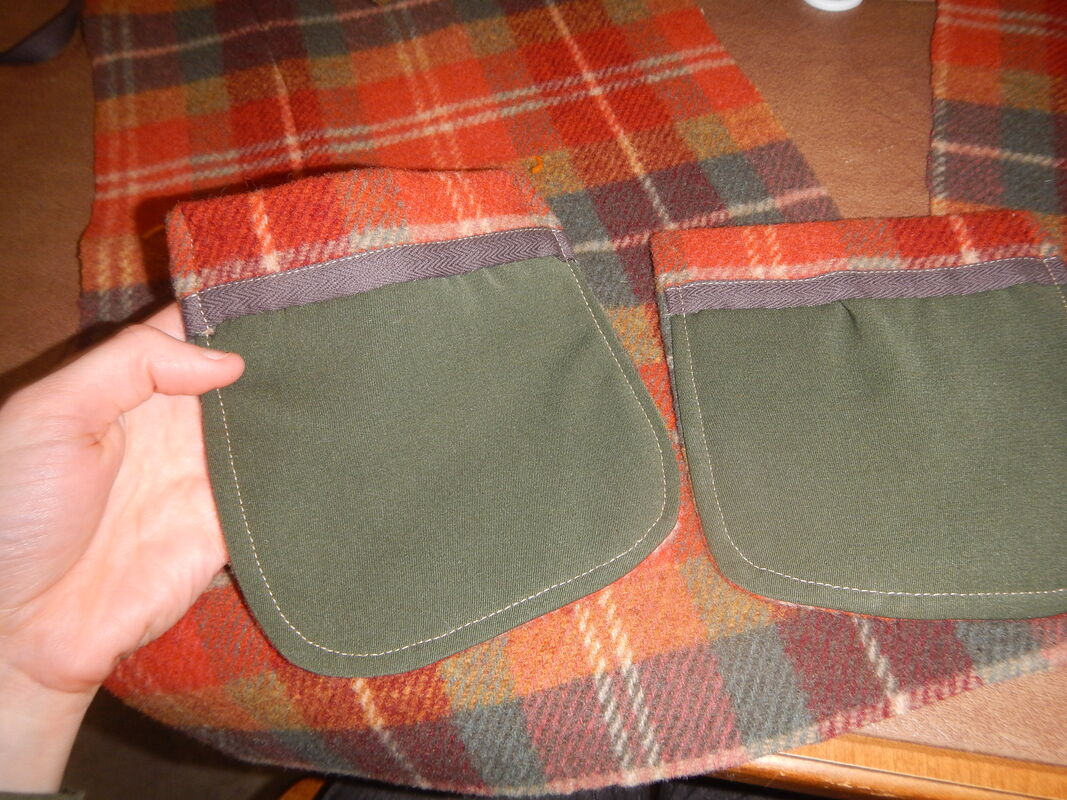
Picture
The blue pen lines trace the plaid and label the colors.
  • The plaid matching continues on the pockets.  I lay the tissue paper pattern in position and trace the important lines of the plaid below. 
  • I also mark the face side of each piece with a piece of paper labeled "face" because it's a twill weave and I don't want to accidentally sew one piece the wrong way round and have the twill slanting diagonally in the wrong direction! 

CONSTRUCTION

Make the patch pockets:
  • Sew them right-sides-together with their lining, then turn them. 
  • Top-stitch them for effect.
  • Decide, after the pockets are done, that I want to add piping to them, so hand-stitch it on.  If I were doing this again, with piping as part of the plan, I would incorporate it into the pockets in the first step instead of tacking it on at the last! 
Picture
Pockets sewn RST before turning. The yellow tufts are the crewel yarn marking the fold line and pocket corners.
Picture
Pockets after turning. This is the inside. The raw edges of the wool are covered with gray twill tape. I bought a roll of the twill tape at one of Fabric Depot's warehouse sales, and it's really quite useful!
Picture
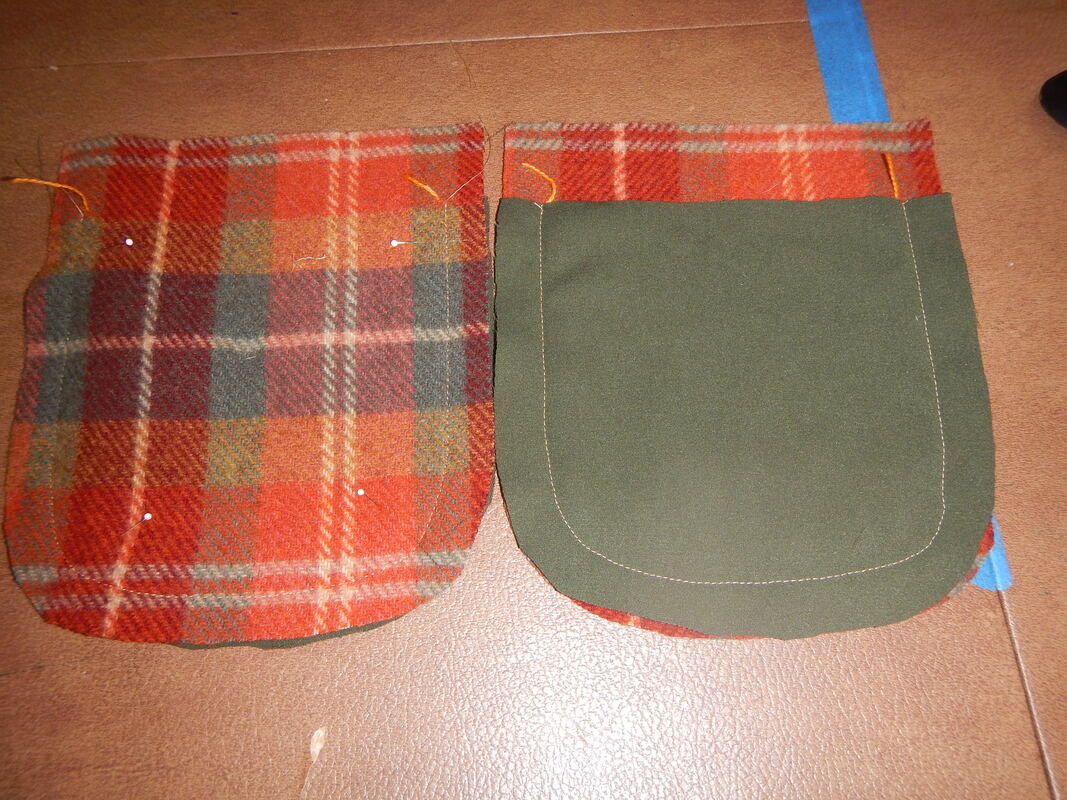
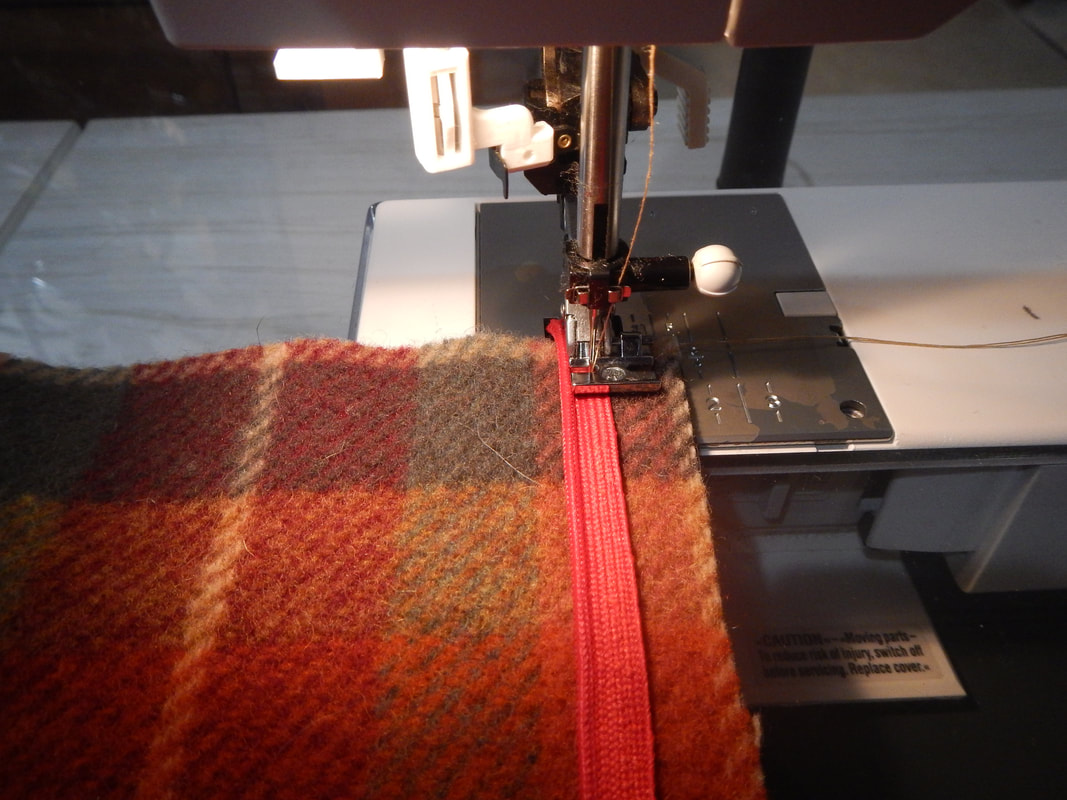
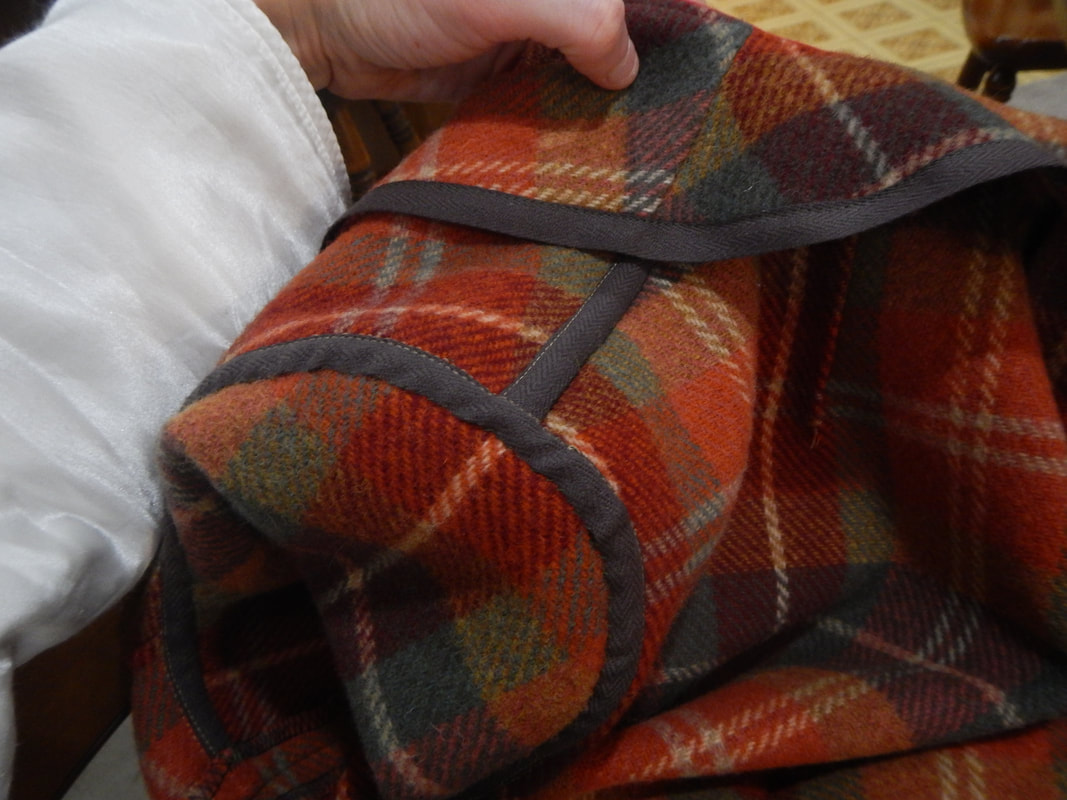
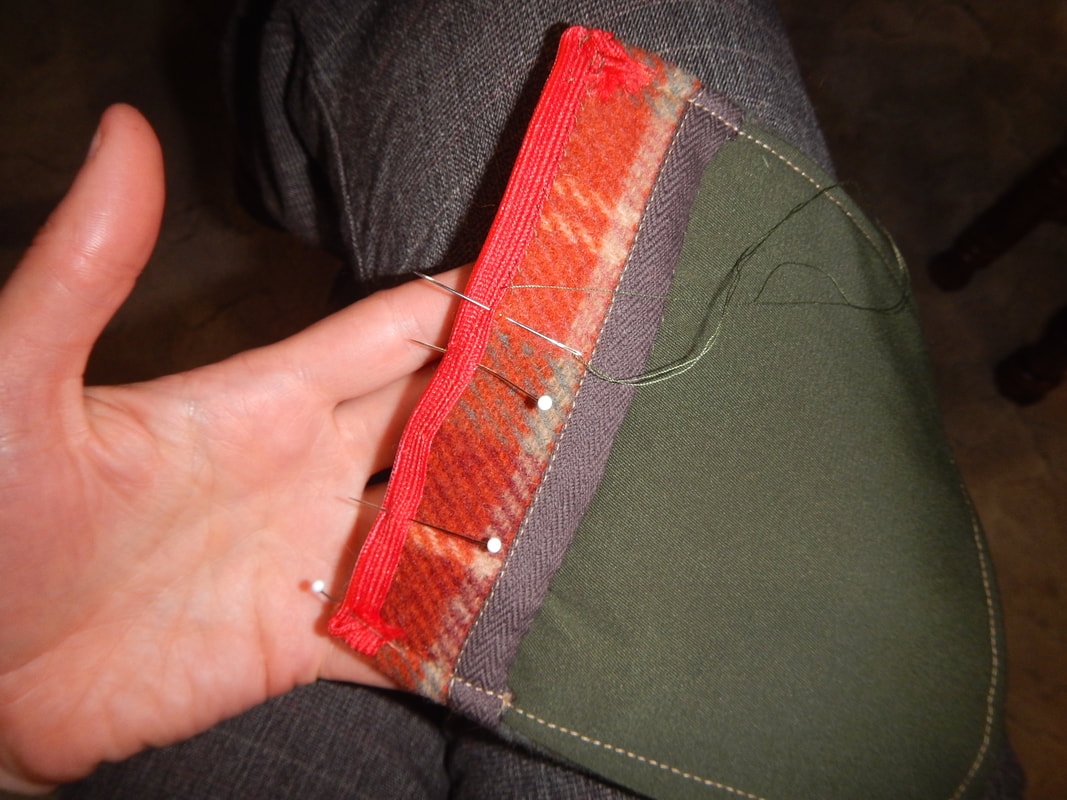
Sewing the piping on as an afterthought. Next time it won't be an afterthought!
Construction Note
You can see that I've top-stitched the pockets before attaching them to the jacket.  This is something I saw on one of the men's sewing blogs I read, either Male Pattern Boldness or Mainely Dad.  The usual method is to use the top-stitching to attach the pocket to the jacket front, all in one step.  But when you do that, the edge of the pocket sticks up as a little flap all the way around and it's not elegant.  Top-stitching the pocket first gives you control over how the top-stitching looks, because you're not maneuvering a whole jacket-front around.  Then hand-stitch the pocket to the jacket around its very edge, with stitching invisible from the outside of the garment.  There are no flaps, and the pocket is a little roomier.  Plus, two steps rather than one makes pattern-matching easier because layers aren't shifting and sliding.  A more elegant method, if slower. 
  • Stabilize the front panel fabric where the pockets will be attached, using twill tape appliqued to the inside.  When I sew the pockets through the twill tape, it is sturdier than through the wool alone, and it helps keep the pockets and the fabric behind the pockets from deforming with use. 
Picture
  • Sew shoulder seams.  So nice to be able to hang the garment on a hanger, now!  (I think my housemate likes this stage, too: she goes to bed with the dining room a mess of fabric pieces and wakes up to an identifiable garment on a hanger!)
Picture
piping basted within seam allowance of CF
  • Baste piping to front opening in seam allowances.  Sew facing to front opening and turn. 
Unintended Consequences
Putting the piping in the Center Front firms it up a bit, which looks good, but which also makes it trickier to turn the bottom corner when hemming! 
  • Pin sleeves into armscyes.  At this point, the somewhat squishy nature of the wool comes in handy.  I match the plaid lines up by color, and where they don't fit perfectly, I can massage them into position. It's really exciting to see the plaid match perfectly!  I can't take all the credit for it.  I think it comes from the pattern being well drafted, plus the wool being pliable, plus my careful layout and cutting. 
Picture
pinning sleeve into armscye
Picture
Ironing over a ham
  • Sew sleeves into armscyes, using more twill tape to cover raw edges.  Iron shoulders over a ham. (This is all easier to do without the side seams being sewn, which is why I tend to do sleeves first and then side seams.)  Hand-stitch the twill tape down to fell and enclose the seam. 
  • Serge the side seam allowances, from bottom of the front panel, up to the underarm area, all around the sleeve, and down the back. 
  • Sew the side seam.  Press open and tack open at armpit seam intersection. 
Picture
Side seam pinned and ready to be sewn
  • Hem sleeves and hem bottom.  The sleeves are already serged, so I just turn up and hand-stitch.  The hem I do with more twill tape, because it'll be visible when I open the jacket. 
  • Sew the shoulder pads in place. 
Picture
Interior of shoulder & armscye seams and neck facing. Love the twill tape!
Picture
Sewing shoulder pad in place.
  • Try on.  Decide it needs back darts to avoid looking dumpy. 
  • Hand-finish by tacking facings down and inserting a hanger-loop inside the back neckline, attached to the back pleats.  I may never use the hanger-loop, but if I do, it'll pull on the most stable region of the nape. 
Picture
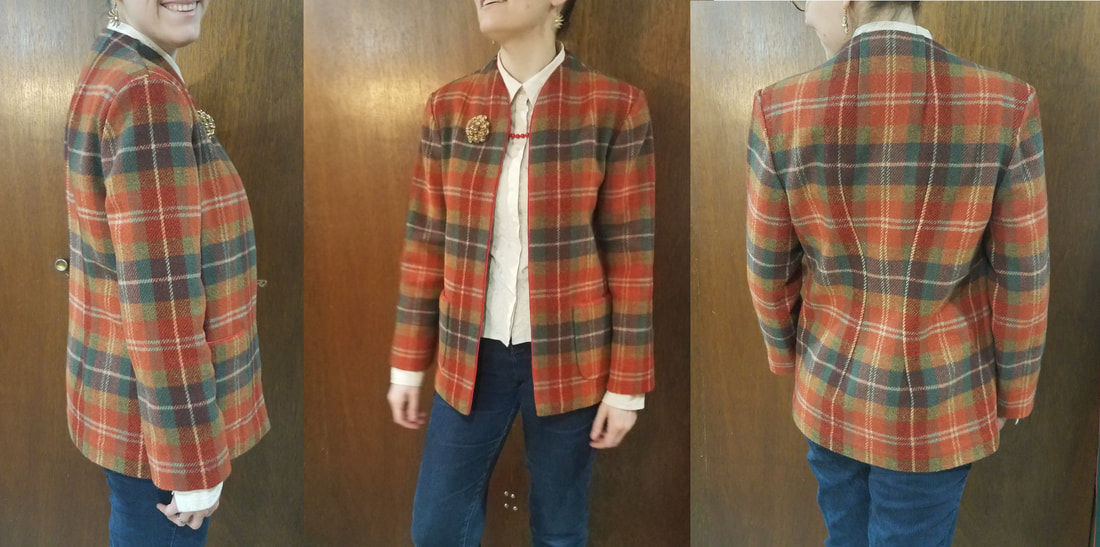
Ta-da!

TIME TO MAKE?

Three nights of work.  Three solid nights... the kind where you stay up 'til three a.m. because you're absorbed and having fun. 
1 Comment
The Sister
1/15/2019 09:08:58 am

And here it is! I love the colors on you! They're very autumnal and warm; make me want some hot chocolate. It looks good, and I enjoy reading all the details as you learn and experiment.

Reply


Leave a Reply.

    Karen Roy

    Quilting, dressmaking, and history plied with the needle...

    Categories

    All
    1910's
    Alteration
    Antique
    Dyeing
    Embroidery
    General
    Hand Sewing
    History
    Lacemaking
    Mending
    Menswear
    Millinery
    Modern Elizabethan
    Musing
    Other Sewing
    Philippians 4:8
    Project Diary
    Quilting
    Regency
    Retro
    Self Made Pattern
    Self-made Pattern
    Terminology
    Victorian
    Vintage

    Blogs I Read

    The Dreamstress
    Male Pattern Boldness
    ​
    Lilacs & Lace
    Tom of Holland
    Fit for a Queen
    Line of Selvage
    Mainely Menswear
    Bernadette Banner

    Archives

    January 2023
    December 2022
    November 2022
    October 2022
    September 2022
    August 2022
    October 2021
    September 2021
    August 2021
    July 2021
    June 2021
    May 2021
    April 2021
    August 2020
    June 2020
    May 2020
    April 2020
    March 2020
    January 2020
    December 2019
    November 2019
    September 2019
    August 2019
    July 2019
    May 2019
    April 2019
    March 2019
    January 2019
    December 2018
    November 2018
    October 2018
    September 2018
    August 2018
    July 2018
    June 2018
    May 2018
    April 2018
    March 2018
    February 2018
    January 2018
    December 2017
    November 2017
    October 2017
    September 2017
    August 2017
    July 2017
    June 2017
    May 2017
    April 2017
    March 2017
    February 2017
    January 2017

    RSS Feed

Blog

Quilting

Clothing

About

Copyright Karen Roy
​© 2017-2022