Robes de Coeur
  • Blog
  • Quilting
  • Clothing
    • Menswear
    • Womenswear >
      • Self-Made Patterns
      • Commercial Patterns
    • Hats
    • Miscellany
  • About
  • Blog
  • Quilting
  • Clothing
    • Menswear
    • Womenswear >
      • Self-Made Patterns
      • Commercial Patterns
    • Hats
    • Miscellany
  • About

Needlelace!  My work so far...

9/7/2017

3 Comments

 
Picture
After a gap of nearly two years, I am feeling inspired to work on needlelace again!  And yet, I haven't posted anything about my past needlelace projects... let me remedy that, to give some context for what I'm doing. 

This'll be a long post, which should please any reader who is anything like me!

WHAT IS LACE?

Every now and then on Say Yes to the Dress some bride will say "I hate lace!" and I'll say back to the TV "How?!" (like that, with the interrobang).  I think lace is beautiful!  And there are so many varieties that there's bound to be some to your taste if you look hard enough. 

In its broadest sense, lace is any fabric where the defining characteristic and the bulk of the patterning is made up of holes.  There are many different methods and tools for making lace, both traditionally and with modern technology.  Here are a few:
  • With two straight needles, you can make lace by knitting.  Shetland scarves are a particularly fine example of knitted lace. 
  • With a crochet hook, you can make crocheted lace. 
  • With a shuttle and a tiny crochet hook, you can make tatted lace.  Needle tatting (no shuttle) is also possible, but having tried both, I prefer the shuttle method as being less wearing on the thread. 
  • With a shuttle, you can make a knotted net and then with a normal needle embroider on it.  This is called filet lace. 
  • With dozens or more bobbins and hundreds of pins stuck in a lacemaker's pillow, you can make bobbin lace, also called pillow lace.  I have never tried it--it looks very intimidating! 
  • With a pre-made net, muslin, and embroidery thread, you can make an embroidered net lace. 
  • With a mix of threads, an embroidery machine, and a chemical bath which eats away at only one of the threads, you can make chemical lace.  Crazy but true!  Lots of commercially produced lace is made by machine-embroidering on a sacrificial fabric, then using a chemical bath to dissolve the fabric leaving only the embroidery behind! 
  • With embroidery thread and scissors, you can make an eyelet lace, also called broderie anglaise. 
But my special area of interest is in the laces made with a simple sewing needle and thread.  And within that diverse category, I am especially interested in the ones of European provenance, the Italian and French styles such as gros point de Venise, Alencon, and point de gaze; I also like the modern lace made with the same techniques. 

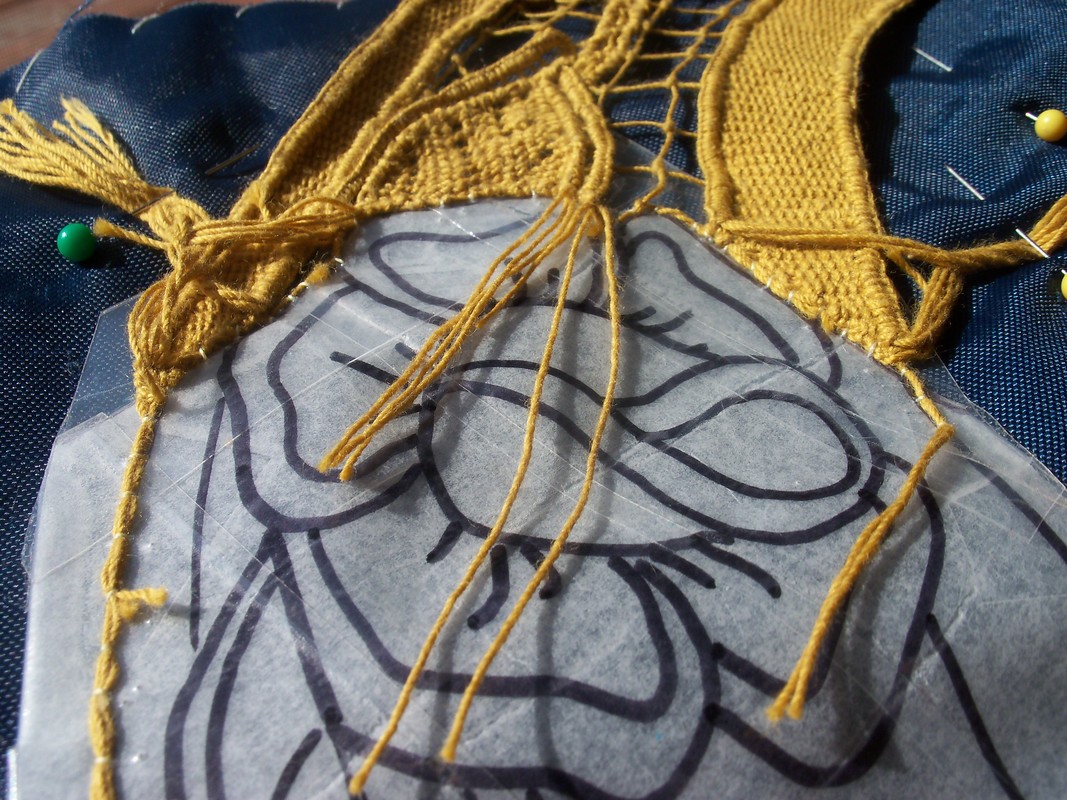
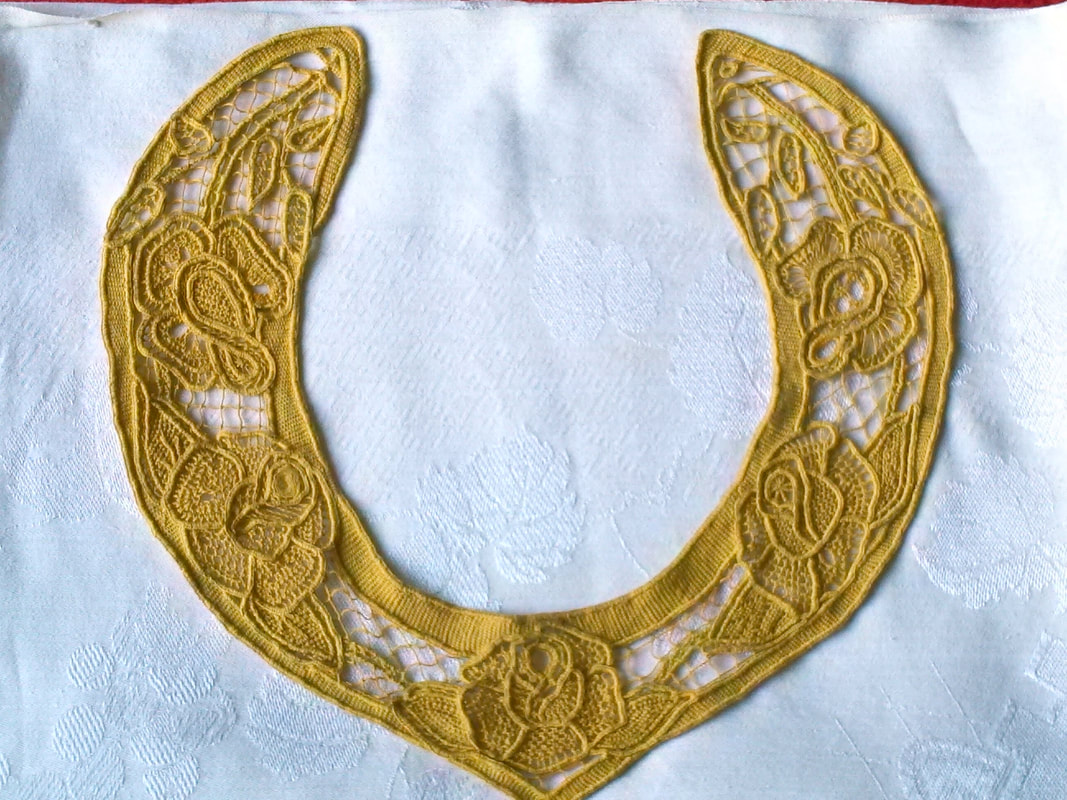
SO WHAT IS NEEDLELACE?

Needlelace is lace made with a sewing needle and thread.  When I say sewing needle, I mean one with an eye through which the thread passes, as opposed to knitting needles or crochet hooks.  The European types that interest me developed from a kind of embroidery called drawn-thread work.  In drawn-thread work, like the Italian reticella style, you start with a piece of fabric, from which you cut and pull threads to make holes, which you then fill with lacy stitches.  Since the drawn threads leave behind square and rectangular holes, the appearance of reticella is very angled and geometric.  As the lace-makers drew out more and more threads, they finally realized that they had more holes than fabric, so why bother starting with fabric?  They came up with another, ingenious method:
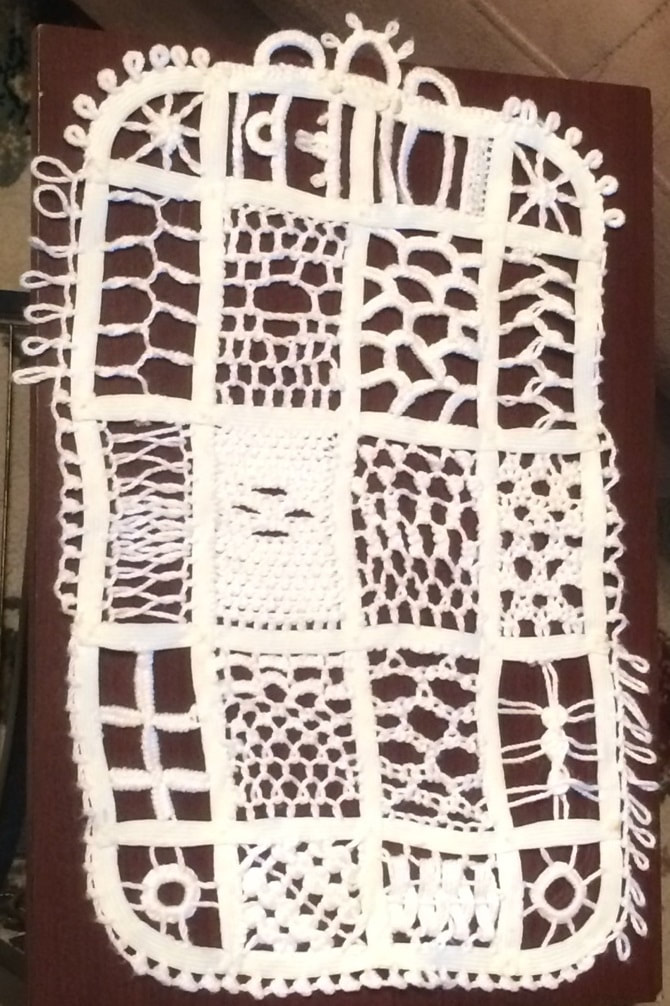
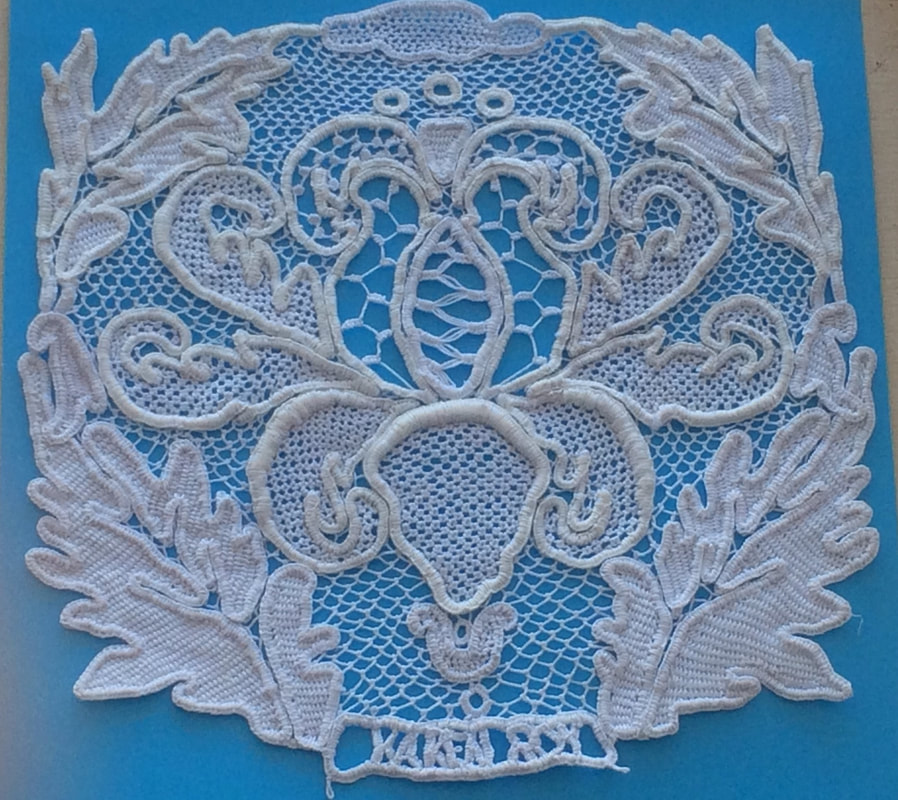
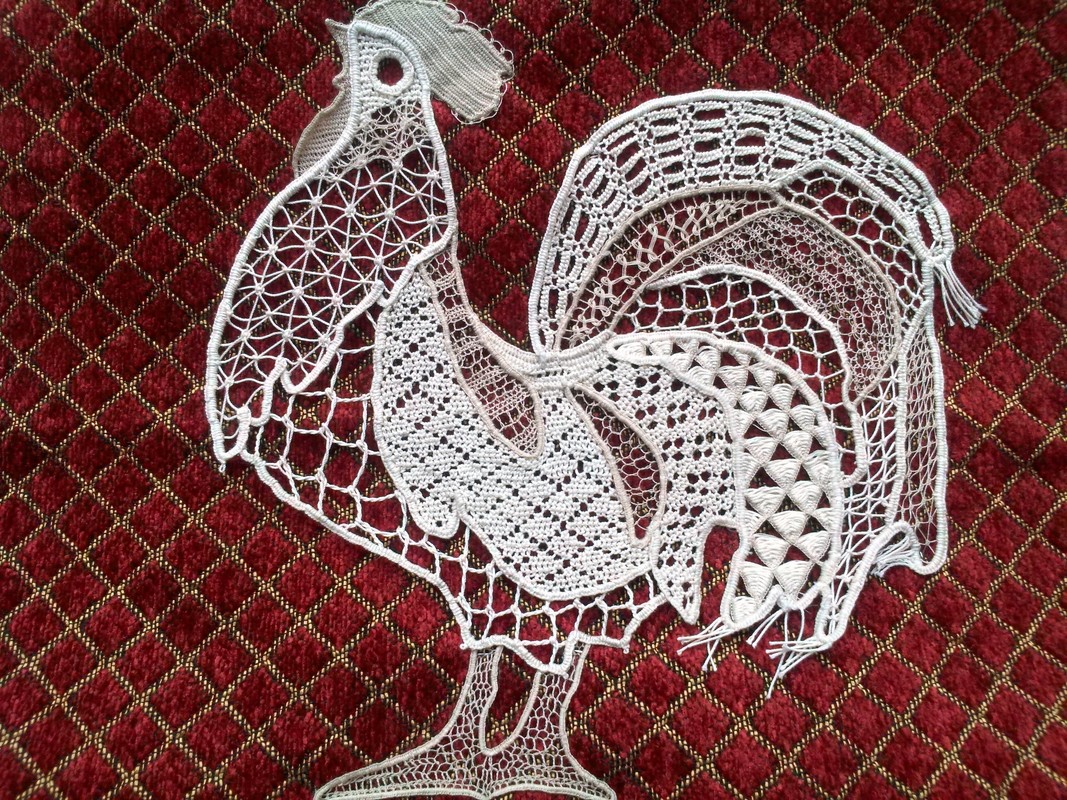
  1. First, a design is drawn on a parchment or piece of vellum.  (I use normal paper and laminate it.)  Because the designs are no longer constrained by the rectangular shapes imposed by drawn threads, this new method opens the door to many new designs, with curving lines and separate motifs.
  2. The lines of the pattern are perforated with lines of holes, to facilitate the stitching in the next step.  (I never do this; I just prick and sew at the same time.  Perhaps I don't need this step because my laminated paper is thinner than the vellum traditionally used?) 
  3. Then the pattern is laid on top of several layers of fabric.  The outlines are followed in thread using couching stitches.  Couching means using one thread to tie another thread down: the couching thread makes stitches through the pattern and fabric, tying all layers together; the couched thread is held down by the couching thread, but does not itself pass through any layers.  The couched thread simply floats on the surface of the pattern, and is called the trace, the foundation, or cordonnet.  (I tend to call it cordonnet, pronounced "kor-DOH-nay".) 
  4. The next step is to fill the background of the pattern with either a mesh or a series of bars.  The stitches of the background are tied to the cordonnet, so they too float on the surface of the pattern, not going through any layers. 
  5. The motifs also are filled with lace stitches.  The French distinguish between "remplis" and "modes" during this step, but I'm not exactly sure what the difference is.  In any case, the pattern is soon all filled in, like coloring in the spaces of a coloring page, but with stitches instead of crayons.  All stitches are tied to each other, not to anything else. 
  6. But what's to keep it all from falling apart when it's taken off the fabric?  Simple: use closely spaced blanket stitches all around the cordonnet to tie it all together. 
  7. Finally, the couching stitches are cut (from the back, so you don't cut the lace) and the lace is released from the pattern and fabric.  This is a wonderful process; like taking off a cast after wearing it for weeks, it's a relief to be able to bend and move.  And like launching a ship after building it in dry dock, this is the real test of your engineering: if you didn't interlock the cordonnet threads well, or if the final stitches are sloppy or loose, the lace could come apart at the joints.  But if it hangs together nicely, what a marvel! 

MY NEEDLELACE

Picture
I started making needlelace around 2012 with a sampler, made using a pattern and instructions from the Reader's Digest Complete Guide to Needlework (1979).  It's a tape lace, or Battenburg lace, because the outlines are made with strips of woven fabric called tape.  Beautiful lacy tape used to be made for just this purpose, but I didn't have any on hand, so I used a shoelace for the structure, and then filled the holes with crochet cotton.  The result is hardly lacy, but it showed me that I enjoyed the process, so I tried again with finer materials.

Meanwhile, this sampler enjoyed a brief stint as a toddler's favorite "soft blanky" and got dragged all over the house!  So we know it's sturdy!

Picture
My next attempt at needlelace, the Damask Flower, came when I was between jobs and staying with my sister in 2014.  This was more ambitious: I designed the pattern myself (I never have much patience with pre-made patterns), tried new stitches, learned about nuances in the final outlining step, and attempted a padded cordonnet a la gros point de Venise.  At this time, I went online and joined the Needle Lace Talk forum.  It's a place where needlelace makers share information and inspire each other with their beautiful work!

Picture
Twenty-fourteen was a good year for needlelace for me!  I next made this rooster, and used it as a chance to play with different weights of thread, layer different stitches on top of each other, and make tasseled ends to the feathers. 

Picture
Next, later in 2014, I tried a larger project.  This collar was large enough that I made it in three pieces, so I figured out a way to connect the edges and cover the join in the final outlining step.  I also made a filet-like net in the background, thinking it looked like a lattice.  This was shortly after I moved to Portland, OR, which accounts for the rose theme. 

Picture
Finally, I closed out the year 2014 with an exuberant free-form Sea Necklace for my friend.  The inspiration was the sea, which she loves, and I made it all from found materials.  The most significant departure from tradition was the lack of trace-thread in the interior of the lace: I bent some florists' wire into the outline, and hung all the stitches off that and each other. 
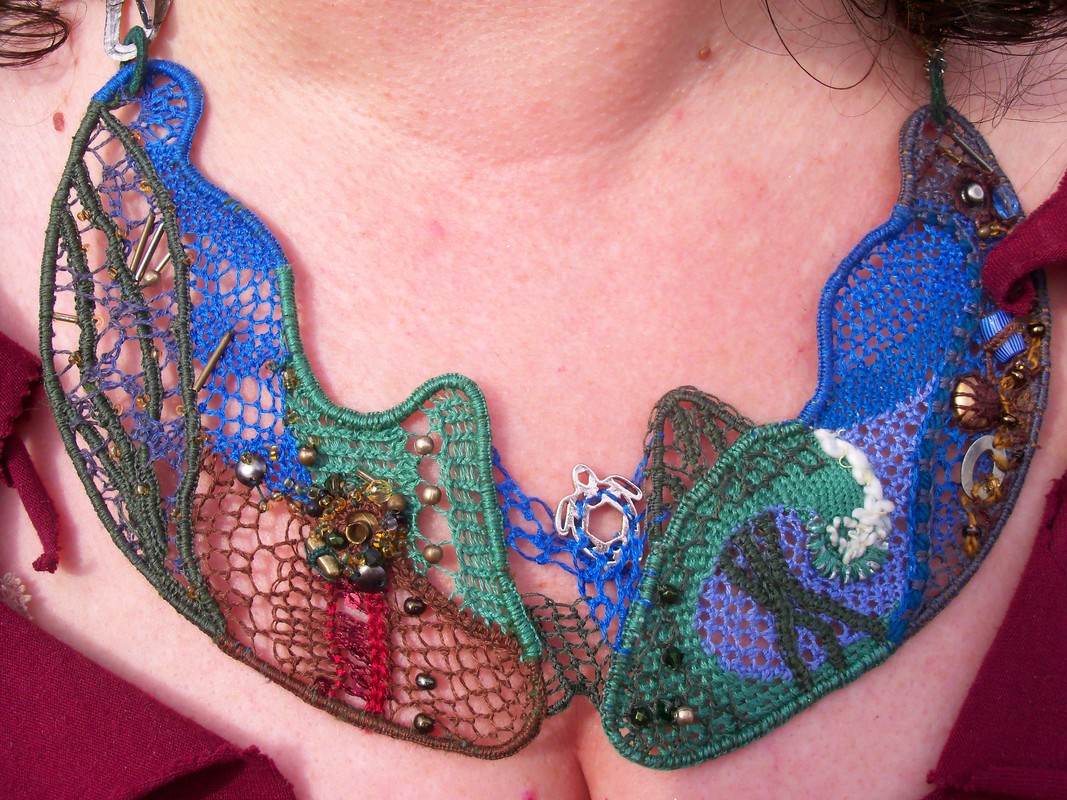
It was a real challenge and education to make the swirling shapes of the waters without any foundation for them, and an unexpected thrill to embroider and put beads and knots on top of the lace, like foam on waves and barnacles on rocks.  Plus, the necklace is perfect for its recipient, and she loves it!  So: win! 

Emboldened by my success with minimal cordonnet, I decided to try another piece like that, and worked on a water lily pattern.  But, as I explain in my My Failures post, this attempt was not a success, and I put it aside.  My attention turned briefly to a maple leaf collar, meant to be an exercise in perfecting picots and making something with a barred background instead of a mesh, but I lost interest when my enthusiasm for dressmaking took up my time, instead.  Now, after a long creative gap, I am once again making needlelace.  I intend to finish the maple collar and am also working on a bookmark project (more roses).  More on those another day!
3 Comments
The Sister
9/11/2017 10:31:21 am

My favorite is still the rooster!

Reply
Lace made link
9/11/2021 01:08:25 am

Nice article! Thanks for sharing this post with us. I really enjoyed reading this post and very helpful for me. Thanks and keep sharing.

Reply
Darlinda McChain
8/25/2024 02:03:33 pm

Can I send a picture for the type of needle work that it is?

Reply


Leave a Reply.

    Karen Roy

    Quilting, dressmaking, and history plied with the needle...

    Sites I Enjoy

    The Quilt Index
    r/Quilting
    Wonkyworld

    Categories

    All
    1910's
    Alteration
    Antique
    Dyeing
    Embroidery
    General
    Hand Sewing
    History
    Lacemaking
    Mending
    Menswear
    Millinery
    Modern Elizabethan
    Musing
    Other Sewing
    Philippians 4:8
    Project Diary
    Quilting
    Regency
    Retro
    Self Made Pattern
    Self-made Pattern
    Terminology
    Victorian
    Vintage

    Archives

    April 2025
    March 2025
    December 2024
    March 2024
    December 2023
    November 2023
    September 2023
    August 2023
    June 2023
    May 2023
    March 2023
    February 2023
    January 2023
    December 2022
    November 2022
    October 2022
    September 2022
    August 2022
    October 2021
    September 2021
    August 2021
    July 2021
    June 2021
    May 2021
    April 2021
    August 2020
    June 2020
    May 2020
    April 2020
    March 2020
    January 2020
    December 2019
    November 2019
    September 2019
    August 2019
    July 2019
    May 2019
    April 2019
    March 2019
    January 2019
    December 2018
    November 2018
    October 2018
    September 2018
    August 2018
    July 2018
    June 2018
    May 2018
    April 2018
    March 2018
    February 2018
    January 2018
    December 2017
    November 2017
    October 2017
    September 2017
    August 2017
    July 2017
    June 2017
    May 2017
    April 2017
    March 2017
    February 2017
    January 2017

    RSS Feed

Blog

Quilting

Clothing

About

Copyright Karen Roy
​© 2017-2024